Game Guide
A persistent, real-time strategy game on Solana. Build your base, gather resources, train an army, and raid rival kingdoms. Your wallet is your identity — every player owns their base forever.
The Game Loop
Assign pawns to gather resources → construct and upgrade buildings → train combat units → raid other players' bases → loot their resources and grow stronger. Pawns keep working while you're offline, up to your vault's storage cap.
Resources
There are four resources. Everything in the game costs some combination of them.


Storage Cap
You can only hold as many resources as your Vault allows. Resources gathered beyond the cap are lost. The Vault upgrades up to Level 25.
| Vault Level | Wood Cap | Gold Cap | Meat Cap | Steel Ore Cap | Raid Protection |
|---|---|---|---|---|---|
| 1 | 500 | 300 | 200 | 300 | 0% |
| 3 | 1,100 | 650 | 440 | 650 | 22% |
| 5 | 2,200 | 1,320 | 880 | 1,320 | 50% |
| 10 | 3,850 | 2,400 | 1,550 | 2,400 | 57.5% |
| 15 | 6,800 | 4,200 | 2,750 | 4,200 | 65% |
| 20 | 11,950 | 7,400 | 4,800 | 7,400 | 72.5% |
| 25 | 21,050 | 13,050 | 8,500 | 13,050 | 80% |
Buildings
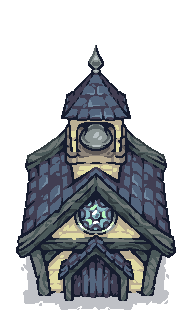
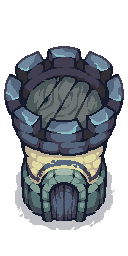
Your base starts with a House. All other buildings are constructed from the Build menu (top-right of your base). Buildings upgrade up to Level 25 — from Level 6 onward, upgrades require Steel Ore in addition to the standard materials. As buildings level up their appearance changes at Level 5, 10, 15, and 20.
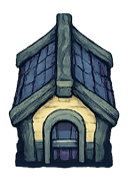
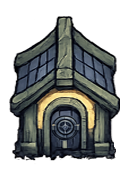
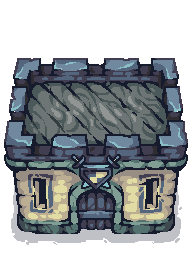
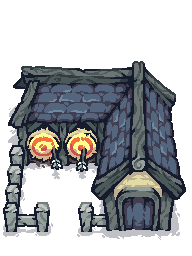

House Levels
House level gates everything else — no other building can exceed your current House level. The House upgrades up to Level 25. From Level 6 onward every other building must be at targetLevel − 1 before the House can advance.
| Level | Max Pawns | Upkeep Cap | Upgrade Cost |
|---|---|---|---|
| 1 | 2 | 20 | — |
| 2 | 3 | 40 | 250W / 150G |
| 3 | 4 | 60 | 550W / 300G |
| 4 | 5 | 80 | 1,000W / 550G / 50M |
| 5 | 6 | 100 | 1,600W / 900G / 200M |
| 6 | 6 | 110 | 1,790W / 1,010G / 225M / 80 Steel |
| 10 | 6 | 150 | 2,815W / 1,585G / 355M / 125 Steel |
| 11 | 7 | 160 | 3,155W / 1,775G / 400M / 140 Steel |
| 15 | 7 | 200 | 4,965W / 2,800G / 635M / 220 Steel |
| 16 | 8 | 210 | 5,560W / 3,135G / 710M / 245 Steel |
| 20 | 8 | 250 | 8,740W / 4,930G / 1,115M / 385 Steel |
| 21 | 9 | 260 | 9,790W / 5,520G / 1,250M / 430 Steel |
| 25 | 9 | 300 | 15,405W / 8,680G / 1,970M / 680 Steel |
Upgrades
Click any building in your base to open its panel and upgrade it. Buildings cannot exceed your current House level. All buildings upgrade up to Level 25.
Costs — Level 1 to 5
| Building | L1→2 | L2→3 | L3→4 | L4→5 |
|---|---|---|---|---|
| Fence | 30W/15G | 60W/30G | 110W/60G | 180W/100G |
| Vault | 200W/150G | 450W/350G/50M | 850W/650G/120M | 1,400W/1,000G/250M |
| Tower | 200W/120G | 420W/250G/30M | 750W/470G/80M | 1,200W/800G/180M |
| Barracks | 150W/100G | 350W/220G/50M | 700W/430G/120M | 1,200W/750G/250M |
| Archery | 150W/100G | 350W/220G/50M | 700W/430G/120M | 1,200W/750G/250M |
| Monastery | 150W/100G/50M | 350W/220G/100M | 700W/430G/180M | 1,200W/750G/300M |
Costs — Level 5 to 6 (first Steel Ore tier)
Starting at Level 6, every upgrade also costs Steel Ore. Costs continue to grow through Level 25.
| Building | L5→6 Cost |
|---|---|
| Fence | 200W / 110G / 20 Steel |
| Vault | 1,570W / 895G / 280M / 80 Steel |
| Tower | 1,345W / 895G / 200M / 60 Steel |
| Barracks | 1,345W / 840G / 280M / 60 Steel |
| Archery | 1,345W / 840G / 280M / 60 Steel |
| Monastery | 1,345W / 840G / 335M / 80 Steel |
Upgrade Times
Level 1→5 (all buildings): Time = target level × 2 minutes. So L1→2 takes 4 min, L4→5 takes 10 min.
Level 6 and above: Time = target level × the building's time coefficient (shown below). Times grow steeply — plan around these.
| Building | L5→6 | L9→10 | L14→15 | L19→20 | L24→25 |
|---|---|---|---|---|---|
| Fence | 2.0h | 3.4h | 5.0h | 6.7h | 8.4h |
| House | 5.8h | 9.6h | 14.4h | 19.2h | 24.0h |
| Vault | 6.6h | 11.0h | 16.6h | 22.1h | 27.6h |
| Tower | 4.9h | 8.2h | 12.2h | 16.3h | 20.4h |
| Barracks / Archery / Monastery | 5.2h | 8.6h | 13.0h | 17.3h | 21.6h |
Tower Stats by Level
Towers auto-fire during raids. Range and attack speed are fixed; damage scales with level (Lv1–5). Higher levels increase tower HP.
| Level | Damage | Atk CD | Range | Upgrade Cost |
|---|---|---|---|---|
| 1 | 11 | 1.5s | 256px | — |
| 2 | 15 | 1.5s | 256px | 200W / 120G |
| 3 | 21 | 1.5s | 256px | 420W / 250G / 30M |
| 4 | 28 | 1.5s | 256px | 750W / 470G / 80M |
| 5 | 38 | 1.5s | 256px | 1,200W / 800G / 180M |
Pawns
Pawns are your workers. They gather resources and construct buildings. You start with 2 — train more from the House panel.
Assignments
Assign each pawn to a resource. Each trip yields 5 units.
- 🌲 Wood — ~14s round trip
- ⛏ Gold — ~17s round trip
- 🥩 Meat — ~17s round trip
- 🪨 Steel Ore — ~16s round trip
- 🔨 Build — assigned to a construction site
Training
Cost: 100W / 100G / 100M
Train time: 4 / 4 / 4 / 10 / 20 / 35 min (gets slower as you have more pawns — 7th, 8th, and 9th pawn also take 35 min)
Max pawns by House level: 2 (Lv1) · 3 (Lv2) · 4 (Lv3) · 5 (Lv4) · 6 (Lv5–10) · 7 (Lv11–15) · 8 (Lv16–20) · 9 (Lv21–25)
Combat Units
Train units from Barracks, Archery Range, and Monastery. Each unit costs 1 upkeep — your House level determines the cap.
| Lvl | HP | Damage | DPS |
|---|---|---|---|
| 1 | 120 | 12 | 10.0 |
| 2 | 165 | 17 | 14.2 |
| 3 | 220 | 24 | 20.0 |
| 4 | 290 | 32 | 26.7 |
| 5 | 375 | 42 | 35.0 |
| Lvl | HP | Damage | DPS |
|---|---|---|---|
| 1 | 100 | 20 | 13.3 |
| 2 | 140 | 27 | 18.0 |
| 3 | 190 | 37 | 24.7 |
| 4 | 250 | 50 | 33.3 |
| 5 | 320 | 65 | 43.3 |
| Lvl | HP | Damage | DPS |
|---|---|---|---|
| 1 | 60 | 8 | 8.0 |
| 2 | 85 | 11 | 11.0 |
| 3 | 115 | 15 | 15.0 |
| 4 | 155 | 21 | 21.0 |
| 5 | 200 | 28 | 28.0 |
| Lvl | HP | Heal/s | Range |
|---|---|---|---|
| 1 | 80 | 4 | 2 tiles |
| 2 | 110 | 6 | 2 tiles |
| 3 | 150 | 9 | 2 tiles |
| 4 | 200 | 12 | 2 tiles |
| 5 | 260 | 17 | 2 tiles |
Raiding
Scout a player first from the World Map, then click Raid to attack their base. You have 3 minutes to destroy as many buildings as possible.
Loot
You steal up to 30% of their exposed stockpile, scaled by damage dealt. 100% destroyed = full 30%. 50% destroyed = 15%.
Fences do not count toward the damage ratio.
Outcomes
- Victory — all non-fence buildings destroyed
- Defeat — all your units died
- Timeout — 3-minute timer ran out
Surviving units always return to your army.
Deploying Units
Select a unit type from the bottom bar then click any grass tile to deploy. Units automatically target the nearest building or enemy defender.
Tower Defense
Enemy towers auto-fire at your raiders from 4 tiles away. Higher-level towers deal significantly more damage — prioritise taking them out early.
Defense Mode
The shield icon below the Build button toggles your base's active army defense. Your Hero always defends regardless of this setting — they do not die permanently when knocked out.
Defense ON ●
When raided, your Hero and your full army spawn and fight back — same AI as raiders. Knights charge, archers fire, lancers pierce groups, monks heal allies.
Defense OFF ●
Your units stay safe — only your Hero and towers defend automatically.
Expedition
Expedition is a real-time action combat map separate from your base. Your Hero ventures out to fight enemy waves, collect loot, and earn rank points. Launch it from the Expedition button in your base or on the World Map.
Safe Zone & Healing Fountain
Each expedition map has a Safe Zone in the center where enemies will not pursue you. Inside the safe zone stands the Healing Fountain — standing within 1 tile of it regenerates 1 HP per second. Use it to recover between fights.
Enemy Waves & Kill Points
Killing enemies in Expedition earns rank points that contribute to the Leaderboard:
| Enemy | Points Earned |
|---|---|
| Knight | +1 pt |
| Lancer | +2 pts |
| Archer | +3 pts |
| Elite Archer (Boss) | +10 pts |
Hero & Inventory
Your Hero is a persistent character that levels up, equips weapons and gear, and both raids with you and defends your base. Unlike army units, the Hero never dies permanently — they are knocked out for 30 seconds then recover.
Hero Inventory
Access your Hero's full inventory from anywhere using the Hero button (bag icon) in your base or on the World Map — no need to be inside an Expedition. The same interactive panel opens: drag items to equip/unequip, use consumables, and view stats.
Equipment Slots
- Weapon — increases attack damage and attack speed
- Shield — increases Stamina (defensive stat)
- Helmet — increases max HP and Stamina
- Armor — increases max HP and Stamina
- Pants — increases Agility and movement speed
- Boots — increases Agility and movement speed
Hero Stats
Your Hero's stats carry over to base defense — a better-equipped Hero is a real threat to any raider even when your Defense toggle is OFF.
Potions
Buy potions from the Merchant inside the Expedition map. They are stored in your Hero's inventory and usable mid-combat via quick slots.
| Potion | Effect | Price |
|---|---|---|
| Small Healing Potion | Restores 30 HP | 10 Gold |
| Medium Healing Potion | Restores 50 HP | 20 Gold |
| Large Healing Potion | Restores 80 HP | 30 Gold |
| Max Healing Potion | Fully restores HP | 50 Gold |
Blacksmith — Equipment Forging
Inside the Expedition safe zone, visit the Smithy NPC to forge your hero's equipment. Spend Steel Ore (gathered by pawns in your base) to attempt upgrades up to +10 on any equipped or inventory item.
What Upgrading Does
- Weapon (+X) — increases STR by 10% of base per level
- Helmet / Armor / Shield (+X) — increases STA by 10% of base per level
- Pants / Boots (+X) — increases AGI by 10% of base per level
Upgrade Costs & Success Chances
Steel Ore is consumed on both success and failure. The upgrade level only increases on a successful roll.
| Upgrade | Steel Ore Cost | Success Chance |
|---|---|---|
| +1 | 30 | 70% |
| +2 | 50 | 60% |
| +3 | 70 | 50% |
| +4 | 90 | 40% |
| +5 | 120 | 30% |
| +6 | 150 | 22% |
| +7 | 180 | 15% |
| +8 | 220 | 10% |
| +9 | 270 | 6% |
| +10 | 320 | 3% |
World Map
An 80 × 60 tile grid. Every player's base occupies one tile. Use the minimap (bottom-right) for quick navigation.
Controls
- G — toggle tile grid overlay
- Scroll / drag — zoom and pan the map
- Click tile — open base info panel
- Click your tile — enter your base
- Click empty tile — select teleport destination
Scouting
Click an enemy tile and select Scout. Travel time depends on distance. When the scout returns you receive a mail report showing their resources and army.
Scout Limit
Up to 2 scouts can be active at once.
Being Scouted
A yellow banner appears in real time if someone scouts you. A red banner pulses during an active raid. Both clear automatically when the visitor leaves.
Marketplace
Access the Marketplace from the scale icon in your base or on the world map. It has two tabs: the in-game Shop and the Buy from Users player-to-player market.
Shop — Protection & Teleport
Buy consumable items using $COKS tokens. Prices update live based on the current market rate.
| Item | Effect | Price (USD equiv.) |
|---|---|---|
| Protection Shield — 3 Hours | Blocks all raids & scouts for 3h | ~$1.50 in $COKS |
| Protection Shield — 6 Hours | Blocks all raids & scouts for 6h | ~$3.00 in $COKS |
| Protection Shield — 12 Hours | Blocks all raids & scouts for 12h | ~$4.50 in $COKS |
| Teleport | Instantly move your base to any empty tile | ~$1.50 in $COKS |
Buy from Users
Players can list Resources (Wood, Gold, Meat, Steel Ore) or Equipment (weapons and gear from their hero's inventory) for any $COKS price. Listings update in real time.
Buying
Switch between the Resources and Equipment sub-tabs. Use the filter pills to narrow by resource type or gear slot. Click a listing and confirm to pay — resources are added to your storage instantly; equipment goes into your hero's inventory.
Selling
Click + List Item and choose Resource or Equipment. Resources are deducted immediately when listed. Equipment shows only unequipped items from your hero's inventory. Cancel any time to get items back.
Max 10 active listings per player.
Protection Shield
A shield makes your base completely untouchable — no one can scout or raid you while it's active. Buy from the Marketplace, activate from your Inventory.
Activating
Open your Inventory (bag icon), find the shield, and click Use. A floating shield icon appears over your tile on the world map so others know you're protected.
Cooldown
Attacking another player while shielded removes your protection immediately and blocks re-activation for 5 minutes. The countdown shows in your inventory.
Teleport
Instantly move your entire base to any empty tile on the world map. Great for relocating near allies, escaping dangerous neighbours, or claiming a better position.
How to Use
- Buy a Teleport from the Marketplace.
- Go to the World Map.
- Right-click any empty tile to select it as your destination.
- Click Teleport Here in the panel that appears.
Your Profile
Your profile is visible on the World Map HUD (top-left corner). It shows your avatar, live resources, and rank points at a glance.
Avatar
Click the avatar box in the top-left of the World Map to open the upload panel. Pick any image — it's automatically resized to 128×128 and saved to your profile. Your avatar appears on the World Map and in the Leaderboard.
World Map HUD
The top-left HUD always shows your current state while on the World Map:
- Avatar — your profile picture (click to change)
- Wood / Gold / Meat — current stockpile vs storage cap (e.g. 150 / 500)
- Rank points — your current combat score
Leaderboard
The Leaderboard ranks all players by their combat score. Open it from the Leaderboard button in the left sidebar of the World Map.
What it shows
Top Player
The #1 ranked player is featured at the top with their avatar, username, lifetime kills, and total points.
Ranked List
All other players are listed below in order from rank 2 downward, each showing their avatar, username, kills, and score.
Rank & Points
Your rank score is earned through combat — raiding other players and defeating their defenders. Resources gathered do not count.
| Action | Points |
|---|---|
| Defender unit killed (raid) | +20 pts |
| Knight killed (expedition) | +1 pt |
| Lancer killed (expedition) | +2 pts |
| Archer killed (expedition) | +3 pts |
| Elite Archer boss killed (expedition) | +10 pts |
(30 × 20) + (20 × 3) = 660 pts